Wednesday, May 22, 2013

Recycle Art Crafts

Bracelet made from an old record by artist Jeff Davis


Bowl made from old record by artist Jeff Davis


 Jeff Davis has some wonderful artwork on sale at uncommongoods.com
Check out his work here:   http://www.uncommongoods.com/artist?artistId=439

Cardboard Wreath by Cardboard Safari

In my search for beautiful recycled products, I found some amazing artists. I'm reposting
photos of the artists work, for your inspiration.

Cardboard Safari offers their unique cardboard art for sale at uncommongoods.com as well
etsy. Check out their etsy store here:
http://www.etsy.com/shop/CardboardSafari


Cardboard Deer by Cardboard Safari

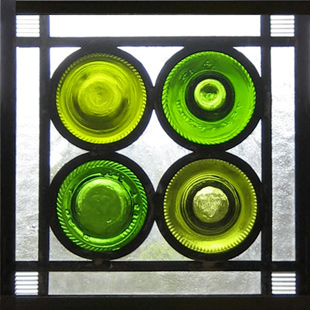
Art made from the glass bottoms of wine bottles by artist Anna Johannson
for the Recycled Planet Store
When I discover artists who make uniquely beautiful items from discarded stuff,
I want to honor them by sharing their work.  Anna Johannson's beautiful works

Bracelet made from recycled flip flops by Claudia Gazesi

Buy Easy Crafts on a Budget for Kids 4 to 104 here: http://www.amazon.com/Easy-Crafts-Budget-Kids-Volume/dp/0615640826

Sunday, May 19, 2013

What Can you Do With Recycled Food Cans?

What can you do with recycled food cans? Punch two holes in the back,
hang them on a bar secured to the wall, add twist ties through the holes to
tie to the bar, for a neat organizer, in your kitchen, on a shelf, or above your desk.

Glue fabric and trims to the cans, for sweet storage containers like the one
shown below. Decoupage the cans with paper, for a decorative desk organizers.
Finish the cans in fabrics, coat them with mod podge for unique candle holders.
Cans make great candle holders for use outside They keep the flame
from going out, and add a warm touch to a dinner table, or party. Even with
the new l.e.d. candles, cans add a warm glow creating an inviting atmosphere.
You may decorate the cans to match your party theme, or room colors.
Have your kids help create unique candle holders, or custom desk organizers for a family project.


Copyright C. 2013 Fuego Phoenix All Rights reserved.
 Beach Themed organizer by Fuego Phoenix

Spray the finished fabric covered cans with Scotch-guard to make them
water resistant. Or coat them with mod podge glue to make them easy to clean.

Copyright C. 2013 Fuego Phoenix All Rights Reserved
 Bright Candle Holders by Fuego Phoenix

Copyright C. 2013 Fuego Phoenix All Rights Reserved
 Candle Holder by Fuego Phoenix

Copyright C. 2013 Fuego Phoenix All Rights Reserved' 

Leather and fabric covered candle holder by Fuego Phoenix.
For this one, I glued leather to the can, added the handmade fabric 
ribbon, then coated the fabric in Mod-podge afterward to make it water resistant.

Buy Easy Crafts on a Budget for Kids 4 to 104: http://www.amazon.com/Easy-Crafts-Budget-Kids-Volume/dp/0615640826

Saturday, May 11, 2013

Candle Holders out of Furniture Legs

Here's an idea for a do it yourself decorating project, diy crafts, or
a handmade gift idea.

I was at the local upholstery store, the other day, when I

noticed a box full of wooden furniture legs. Some were chunky wooden
ones, like you see on contemporary couches and modern chairs, others
are taller and more rounded. I liked the look of the chunky ones,
which are slightly larger at the top (approximately 5 inches square)
than the bottom of the leg, which is about 4 inches square, and stand
about 4 to 5 inches tall. I purchased a couple of these.
 
When I arrived home, I decided to use some mirrors
I've been saving, which are about a quarter inch square, combined
with some metal washers I've been wanting to use.The washers
are square with a hole in the middle for tiny screws.

I lay the mirrors and metal washers on top of one leg, to make
sure they'd fit. I scooted them onto a piece of cardboard,
and put glue along one side of the leg about 1/2 inch wide. I added
the washer first, then a mirror tile, then a washer, until the row
was complete. I repeated this process of adding glue, then
alternating the mirrors and washers, so that they form a checkerboard
pattern. I used tweasers to push them mirrors into place. The mirrors tend
to move around on the glue.

Once I had all the pieces glued, I allowed the glue to set overnight.
The next morning I washed off any excess glue that was on the
mirrors. I bought a small candle, lit it and place it on its new
setting. I'm very pleased with the finished product. This project
is both easy and affordable. I like the look of the shiny mirrors
mixed with the used washers. If you want, you can put
a candle holder jar on top of the wooden leg, for a cool look!

If you don't have access to an upholstery supply store, that
carries furniture legs, you can use a chunky piece of scrap wood,
perhaps from your local carpenter? Just stain or paint the wood,
and add mirrors and metal washers on top. This project
makes home decorating easy.


Simple Furniture Leg

Copyright C. 2013 Fuego Phoenix All Rights Reserved 

Add mirrors and metal washers.


Copyright c. 2013 Fuego Phoenix All Rights Reserved

A unique candle holder.


Buy Easy Crafts on a Budget for Kids 4 to 104 here: http://www.amazon.com/Easy-Crafts-Budget-Kids-Volume/dp/0615640826

Thursday, May 9, 2013

Popsicle Stick Crafts

Enjoy fun, fresh ideas using popsicle sticks.

We created our  "beach house", putting the walls together first,
then a floor, using upholstery cardboard tack strips. We used wine corks
for columns. When we completed the house, we glued the bottom of the
house to cardboard for stability, then painted it bright colors.

Copyright c. 2013 Fuego Phoenix All Rights Reserved

Copyright  c. 2013 Fuego Phoenix All Rights Reserved


This is one of the fun, projects in Easy Crafts on a Budget for Kids 4 to 104.
Buy it here: http://www.amazon.com/Easy-Crafts-Budget-Kids-Volume/dp/0615640826


Wednesday, May 8, 2013

Recycle Arts and Crafts from Plastic, Metal and Cardboard

Spider made from scissors confiscated by tsa, by Christopher Locke
I'm still not finished with my large canvas painting, so I've rounded up
some photos of art and crafts projects made from recycled metal, electronics,
kitchen utensils, and cardboard.

Next week, I'll share projects my grandson and I have made,
and ideas I've experimented with.I'm also working on the ebook
of my new book, Easy Crafts on a Budget for Kids 4 to 104, which
has craft projects for the family to enjoy all year.

Until the ebook is finished, and the painting is completed,
enjoy these recycle arts and crafts, made from plastic,
metal, and cardboard.


Wine rack made from old vinyl records

Tuesday, May 7, 2013

More Cardboard Kids Crafts

Today I'm reposting photos of very cool cardboard kid crafts.
Some of these crafts like the carboard bowl, are much more detailed.
All of the crafts are unique. The cardboard gameboy,
kitty house, castle, and our own kids cardboard playhouse,
are projects you can easily create.
I hope these crafts give you ideas for creating
fun cardboard arts and crafts for kids.

Gameboy designed by born 2 draw


Cardboard bowl by SEM design

Cardboard Gundham Replica


Cardboard Scream by Mark Langan

Copyright c. 2013 Fuego Phoenix
Cardboard playhouse by Fuego Phoenix

cardboard castle by allfortheboys.com

from tumblr.com

Cardboard shelf from Popular Mechanics

Monday, May 6, 2013

Art From Recycled Materials

The sculpture above is made from recycled coke cans.


I am very excited about art made from recycled materials.
It's wonderful to see beauty coming from things we use everyday, not
to mention beauty made out of items that are clogging our oceans.

I'm always looking for new ways to repurpose food cans,
boxes, metal parts, plastic bottles, furniture, wood, and other items.

Today, I'm sharing some inspiring work, made from recycled plastic,
metal parts, electronics, tires, wood, guns (yes guns) and glass. While
these are not easy projects, I'm sharing in the hopes the art work will
inspire you to create your own recycled art!


The sculpture to the left is made
from rotten river wood.

The centipede to the right is made from
recycled cake pans.

The giant 22 foot sculpture to the left is made
from recycled polystyrene foam.

These sculptures are made from discarded electronics, by WeeeMan


The rocking chair above and the elephant to the
left are made from recycled guns.

The horse sculpture to the right is made
from recycled tires.
The photo to the right is reposted from funnychill.com

Sunday, May 5, 2013

Recycled Plastic Crafts

I was searching for an artist, who creates art, sculptures, birds
and other animals out of recycled plastic detergent bottles.
I couldn't find her, but in the process of looking, I discovered
two very talented eco friendly artists. 

Michelle Brand creates a beautiful plastic curtain from the bottoms of water containers.
She also created a sculptural light pendant, in the same way. She pieces the plastic
bottles precisely, with a clothing tag attacher, shown in the last photo, which
can be purchased on Amazon for around $20. What could you create using this method?


I came across another artist named Sayaka Ganz, who creates animal sculptures from
plastic kitchen utensils. Her inspiring creations are shown below.


Saturday, May 4, 2013

Kids Spy Themed Crafts

Today I'm sharing two cool craft ideas I discovered. 
My grandson is fascinated by the "spy theme" right now. 
These two fun projects for kids, fall under that category.
Enjoy!

How to Make Invisible Ink

Be a secret agent. Write a secret message on paper and have it revealed only by the heat of a light bulb

Supplies Needed:
Half of a Lemon
Water
Spoon
Bowl
Cotton Swab
White Paper
Light Bulb

1)  Squeeze some lemon juice into a bowl and add a few drops of water.

     Mix the water and lemon juice

2)  Dip the cotton swap in the juice mixture and write a message on the white paper

3)  When your message dries, hold the white paper up to a light bulb that’s


      on to reveal the message


Fingerprinting

Pretend you are a part of the FBI, or CSI, and discover what your fingerprints look like

Supplies Needed:
Paper
Pencil
Tape


1) Draw an outline of your right hand on a plain piece of paper.
2) Draw and outline of your left hand on a piece of paper.
3) Take a pencil and scribble on a piece of paper until you have a nice big black mark.
4) Then rub your index finger in the mark. Your index finger is the one next to your thumb.
5)  Now get some tape. The best tape to use is called transparent tape or utility tape. 

     Put a piece of it over your finger, press down, and pull it off.
6)  Pull the tape off and place it on the drawing of your hand. Now you can see 

      your fingerprint.


Buy Easy Crafts on a Budget for Kids 4 to 104 here:http://www.amazon.com/Easy-Crafts-Budget-Kids-Volume/dp/0615640826

Friday, May 3, 2013

Homemade gesso

Update: Homemade modpodge works!

I am beginning work on a design for a huge canvas painting, which
will be 7 feet high by 11.25 feet wide. I priced Gesso to coat the
canvas,  at the local craft store, it is over $25 a gallon (that's the cheap
stuff). I decided to check for a homemade version of gesso.

Just in case you're not familiar with gesso, it's a binder used on
wood and canvas to hold paint so that the wood grain does not
show through the painting, or so the grain of the canvas does
not show through the paint.

 
Guess what??
I found a couple of recipes.  I'll  share them with you, after
I've created and tested them this weekend.

 This homemade gesso can be sanded, holds paint well,
and costs much less than the gesso you buy in art stores.

I'm in the process of drawing out the design for the canvas.
sewing the canvas pieces together, and then adding the
gesso. It's exciting for me to find out how well
homemade gesso works. I'll report back to you.


Wednesday, May 1, 2013

Homemade mod podge glue

I just found this on pinterest. I haven't tried it yet, but from all the
testimonials about its effectiveness, I'd say it is a hit!
I will try it myself tonight, and report to you tomorrow.

I use mod podge for paper crafts, paper mache projects, kids
crafts, fabric crafts, and popsicle crafts. I use it for sealing
finished paper projects, and for use on recycled  material crafts.

Here is the recipe:
Mix elmers glue with water, 50% glue + 50% water.
Shake well. Store in the jar with a lid. Costs much less!

Happy Crafting!